

How To Use Auto Lip Sync In Adobe Animate
Lip Synchronization in blitheness is the art of making an animated character speak with pre-recorded dialogue. This procedure involves actual animation of the mouth with dialogue and speech timings. This Lip sync blitheness makes your grapheme come alive.
The lip syncing process in animation was washed frame by frame method in the olden days. This method takes more than fourth dimension and requires a skilled animator to create the lip syncing procedure in the blitheness.
But due to the evolution of computer technology and software, the Lip synchronization in animation now quick easy and saves time. The Synfig studio blitheness software has auto lip-Sync feature that helps the animator to consummate the procedure with less effort.
This synfig studio uses Papagayo-NG software that helps to control spoken language timings and to create sound layer. This audio layer contains set of song folders according to the background voice. This open source Papagayo-NG software was developed by Lost Marble.
Below are three central steps that will help the animator to create lip synchronization in blitheness with Synfig studio software.
1. Creating Mouth Shapes in Synfig Studio
The lip synchronization process requires different rima oris shapes co-ordinate to the phonetic syllable. So animator need to draw the different mouth shapes as per rima oris chart shown below .

The fatigued mouth shapes should exist named as "AI, E, balance, etc, FV, 50, BP, O, Q and WQ" for piece of cake agreement. This naming method will help you later. The graphic symbol with different set up of oral fissure shape should be used during dialogue animation.


two. Controlling oral communication timings and creating sound layer
The Papagayo-NG software is used for controlling speech timing and creating sound layer. The user interface of this software is very uncomplicated and easy to empathise. Beneath is the simple procedure that helps you to create audio layer.
1. Import the pre-recorded dialogue file by "File-open" selection. Papagayo-ng supports mp3 and wav audio file formats.
2. Select the type of mouth chart equally shown in image.
3. Choose your linguistic communication in phonetic breakup. This software supports the languages like English, high german, french, finnish, dutch, italian, russian, spanish, swedish and more. Y'all can choose pidgin english language if language support is not bachelor.

4. Choose Preston blair or Flemming Dobbs phoneme set as per your need.
5. Type the dialogue into give-and-take class in the selected language under the spoken text box as shown in the paradigm. You tin can blazon english phonetic messages if you chosen pidgin english language as language.
6. At present select the breakdown option. This helps to brand sentence rail and give-and-take track on the audio working area.

7. Now you can control the voice communication timing by dragging sentence rail and word track in audio working expanse.
8. Once control of speech timing is finished, salve this file in .pgo format using the save option in the file carte. This pgo file contains sound layer for lip synchronization.
Please note that, the .pgo file and pre-recorded audio file must exist in the same binder.
three. Implementing sound layer in the scene
You must gear up the background and characters in the synfig studio before implementing the audio layer. Please notation that,the frame length of animation should exist greater than frame length of pre-recorded audio. This frame length can exist controlled past fourth dimension pick in sheet properties.
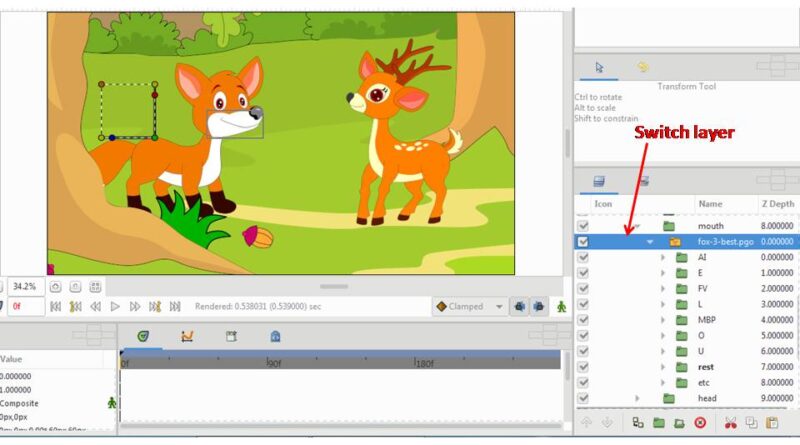
1. At present you tin import the pgo file using file-import option. This process creates sound layer and switch layer on the layer tree. This switch layer contains empty phonetic folders named AI, E, rest, etc, FV, 50, BP, O, Q and WQ.

2. This switch layer should be drag and drop to inside of character's mouth layer, where the different set of mouth shapes fatigued earlier.
3. Now you need to drag the fatigued AI folder (that contains drawings of oral cavity shape) and place inside the switch AI folder. Repeat the same drag and drop process for remaining E, residual, etc, FV, L, BP, O, Q and WQ folders.
4. Now you tin preview the lip sync animation using preview button. Sometimes the lip sync might be faster during animation. And then you tin add the stroboscope layer to a higher place the switch layer. This layer helps to control the speed of lip sync in the blitheness past changing the frequency in the parameter option. The frequency value must exist 10 to 15 for amend experience.
The above procedure helps you lot to animate the lip synchronization according to the pre recorded audio. This auto lip sync process makes accuracy on oral communication timings. The papagayo-NG and synfig studio software helps to make quick and piece of cake for animation of lip sync.
Y'all can as well read the review of Synfig studio software hither to get more understanding.
Source: https://rulatech.com/how-to-use-papagayo-ng-in-synfig-studio-for-lip-sync-animation/
Posted by: raylichannoosee.blogspot.com
0 Response to "How To Use Auto Lip Sync In Adobe Animate"
Post a Comment